The GamerPay Mobile App
GamerPay now officially has an app both in the App Store and Google Play Store!
And we are thrilled to announce the launch of our new mobile app, bringing the ultimate Counter-Strike marketplace right to your fingertips.
In this article, we go through the app, from how you download it to how you navigate and use the app and a step-by-step tutorial on how to purchase an item straight from the app.
Buying CS2 skins, while not on your PC, has never been easier!
The GamerPay app is officially in the App Store!
First, you have to download the app from the App Store.
Go to either App Store or Google Play Store to download the mobile app.
After you download it, you need to go to the app and sign in with your Steam Account which is linked to GamerPay. After you sign in via Steam, you now have access to the app and all of its perks!
How to navigate the app?
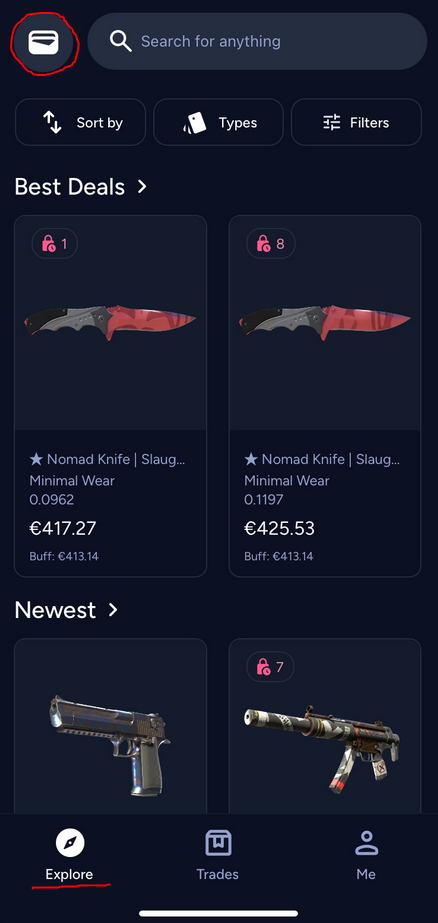
If you successfully signed into your account, you will now see the three main buttons at the bottom of your phone. These are “Explore”, “Trades” and “Me”.
Explore: With Explore you can discover new skins, look for crafts, and see all the items which are listed on GamerPay. You can easily set filters, sort and purchase, just like on on desktop. But an item, while not being on your PC, is now much more comfortable and easy.
Trades: With “Trades” you can see your trade history on GamerPay, and see what items you bought or which items you are awaiting for the seller to accept and deliver. Your “Bargains”, and “Tradelocked” items are also on the “Trades” tab.
Note: currently you cannot sell items in the app, but we are working on that!Me: On the Me tab you can find everything about you and your account. You can see your Account details, name, e-mail, and change your currency and market price. Some of the links redirect you to the main Website.
Using and applying filters
If you are on the “Explore” page, where you can find all of the items which are listed on GamerPay, you have to go to “Types” and there you can select all the different skin types for weapons and knives.
If you go on “Filter” you can choose the “Price range”, the “Wear & Float”, and many other options!
How to see my Wallet/Balance funds?
If you are on the “Explore” tab, one click the top left and you can see your wallet/balance funds. These are synced with your GamerPay account across platforms and applications.
Your current balance amount, wallet transactions, and everything else related to funds are listed here, exactly the same as it is on our website!
Click on the top left icon to check your balance/funds!
How to buy items?
Buying items is straightforward. In this part of the article, we will walk you through the process of buying items and skins in the mobile application.
First off, you can use the search filter features to find that specific skin you want to buy.
Tip:
By clicking the screenshot icon in the top right of the item details page, you can download a GamerPay screenshot directly to your phone! Ask your friends what they think of the skin, and get second opinion, before buying it!
Buying the skin:
If you found a skin or item that you want to buy, simply go to the item listing. After you press “Buy now”, you will be asked if you want to use your Wallet fund or buy directly with card.
When you are on this checkout menu, you have to scroll down and press “Place your Order.” Afterwards, you will be asked to “Confirm payment.”
So with just 3 clicks you can purcahse your next skin!
If you have completed the steps, you have successfully bought a skin on your phone. After making the order you can now follow its status under “Trades”.
Conclusion
First off, we want to thank you all for the support. This mobile app is a huge step towards making GamerPay more convenient and accessible to all.
Our devs at GamerPay have worked really hard to make this app a reality. We are excited for all the feedback. The GamerPay application is far from done! We intend on adding more features during 2025. For us it’s really important to make the buying and selling of Counter-Strike skins as easy as possible.
Check out and download the app here:


